
2021 Girard SE, Suite 150
Albuquerque, NM 87106
voice: (505)245-9970, fax: (505)245-9971
email: adrwfs@mza.com, web: http://www.mza.com
 |
MZA Associates Corporation 2021 Girard SE, Suite 150 Albuquerque, NM 87106 voice: (505)245-9970, fax: (505)245-9971 email: adrwfs@mza.com, web: http://www.mza.com |
Program Overview
The Adaptive Dynamic Range Wavefront Sensor (ADRWFS) GUI program gives the user a simplified way of adjusting the software test setup to the optical test system and provides several options to measure and display the aberrations of a wavefront. There are three separate tests that can be performed. The main test utilizes different methods to acquire a camera image of the lenslet array foci for the current wavefront and computes the resulting Zernike coefficients. The pixel test, on the other hand, uses a software created image with user defined aberrations to compute the coefficients. The other test, allows the user to enter the Zernike coefficients in order to recalculate the coefficients backwards hereby testing the software calculation routines. The GUI program is written for the Matlab environment interfacing with the image data acquisition board and the spatial light modulator (SLM) using MEX-files.
User's Guide
The following links describe the GUI program features and procedures:
Software configuration and requirements
The ADRWFS GUI program is written for the Matlab environment and is designed to interface with specific hardware using Matlab MEX-files:
The directory containing the main program files and the camera configuration file Dalsa256A.cnf is C:\adrwfs. Additional files used by the program are in the subdirectories cam.tbx, slm.tbx, timer.tbx, aoshop.tbx, and wfscomp.tbx.
The SLM raster image files (*.s10) and frame rotation list files (*.frl) used for the SLM operation are stored and read from the subdirectory adrwfs\slm. Necessary frl files that should be present in this directory are frl0.frl, frlvbar.frl, frlhbar.frl, frlsingle.frl. The default data file data.txt is stored in the subdirectory adrwfs\data.
Starting the program within Matlab
To start the Wavefront Sensor System Control program type
>> wfssc
within the Matlab Command Window. Be sure that the current Matlab directory points to the directory containing the main program file wfssc.m. The following files are needed to run the program and must be in the Matlab path:
During startup, the configuration file config.mat is read, restoring the last test setup without having to rebuild the test matrix. The file resides in the same directory as the wfssc program and stores the test parameters and test matrices. If the configuration file can't be found the program uses predefined parameters. To save different test configurations for later reuse, copy the config.mat file to a different file name after exiting the program. To restore a certain setup, rename its configuration file back to config.mat.
Exiting the program
Exit the program by clicking on the Exit button, selecting Close in the File menu, or clicking on the upper right window X button. All open dialogs will be closed and the current test setup is saved in the configuration file.
Wavefront test
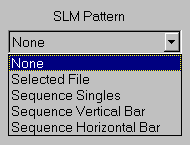
In regular mode, without the Pixel Test or Zernike Test dialog showing, pressing the Test button will measure the present wavefront. This includes acquiring a camera image of the lenslet array foci, computing the resulting Zernike coefficients, and updating the graphical display. There are five different ways to measure the wavefront, and the SLM Pattern popup list shows the current selected choice. A description of each option follows:
 |
 |
In order to achieve an accurate measurement, the mask layout and the SLM pattern sequences need to be adjusted to the current optical setup. This is done in the corresponding Setup menus and explained in the test setup procedure. For each test the camera test frame is displayed, the computed Zernike coefficients are listed, and the selected graphical display is updated. In addition, to prevent errors, most of the setup dialogs and test controls are disabled during testing. The test time will be the shortest with the mask overlay and live camera turned off and the spot mesh graphical display not selected.
When testing with no SLM pattern (None) or a single SLM pattern (Selected File), multiple samples of camera images can be acquired to calculate the mean of the Zernike coefficients. In this case, the Zernike coefficients are determined for each image and then the mean and the standard deviation of all coefficients is computed and displayed. The sample rate can be adjusted by moving the Sample slider. The maximum number of sample frames that can be acquired during the display of a single SLM pattern is currently set to 50.
Pixel test
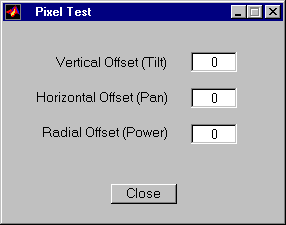 |
The Pixel Test can be applied to test software created wavefront images allowing the user to evaluate the calculation of the Zernike coefficients for distinct aberrations. To start the Pixel Test, open its dialog in the Setup menu and set the desired vertical, horizontal, and/or radial offset in positive or negative numbers of pixels. One can test any of the five test options, None through Sequence Horizontal Bar, using one sample. The pixel images tested are created by highlighting one pixel in the center of each mask defined lenslet square shifted by the specified offset. A radial offset will shift the highlighted pixels in proportion to their distance from the mask center. As long as the Pixel Test dialog is open, software created images will be used instead of camera images to compute the Zernike values. |
Zernike test
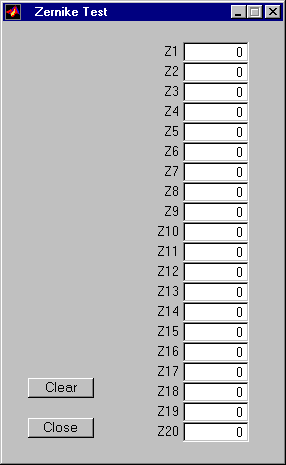 |
With the Zernike Test, the accurate calculation of the Zernike coefficients can be verified. In its dialog, opened in the Setup menu, all Zernike coefficients can be specified. A test will then recalculate the coefficients backwards using the inverse matrix and display the results. One can also determine the difference of the exact RMS phase, in this case the RSS value, and the computed RMS phase of the wavefront. The Zernike Test uses no images, is independent of the SLM pattern selected, and is active as long as its dialog is open. Another way to utilize the Zernike Test is to view the shape of the surface plot for individual Zernike coefficients. |
Necessary steps to setup the test system
During the initial setup of the test system, the overlay mask and the SLM pattern files have to be aligned to the optical system. Following is an ordered list of steps that should be performed each time the optical system setup has been altered:
After all steps have been completed successfully the actual testing can begin. Test the current setup and set the result as the reference. To record the measured values, specify a data file name under the File menu and set the AutoSave option. For faster testing, turn off the live camera display and the mask overlay.
Mask layout
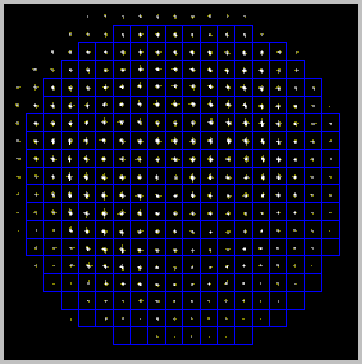 |
Lenslet image with mask overlay The mask layout defines the main geometrical test setup and thus influences the measurement of the Zernike coefficients. For accurate test results the mask has to be aligned with the optical system. Each square of the mask represents a lenslet area with its center being the focal point defining the "perfect" light source without aberration. For the initial setup of the test system, the optical system and the mask layout need to be adjusted the way, that all lenslet foci are in the center of the squares as good as possible. This includes tuning the power and tilt of the light source and maybe adjusting the camera and SLM position. |
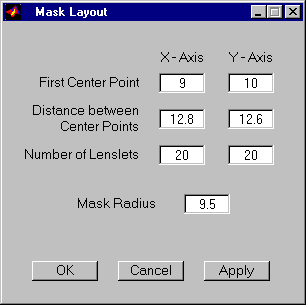
Mask layout dialog window To modify the mask layout, open the Mask Layout dialog in the Setup menu, change the parameters and press the Apply button to view the new mask. One should first center the squares over the lenslet foci, changing the pixel coordinates for the first square center and the distance between the centers. Keep in mind that the x-axis points down, the y-axis to the right, and that the parameters are unrelated to the SLM pattern image parameters. In addition, the program will automatically adjust the parameters that are out of range in order to prevent the mask falling outside the screen. Once the mask is centered over the lenslet spots, one can adjust the overall size of the mask by modifying its radius. Make sure the number of lenslets is 20 by 20, as this is necessary to achieve correct test results using SLM pattern/sequences with the present software. To keep the current layout hit the OK button, to restore the previous layout hit Cancel. The first time a test is performed after the Mask Layout dialog has been closed, the program must re-calculate the phase matrix, which can take several minutes depending on the number of lenslets. |
 |
The display of the overlay mask can be turned off in the Options menu. The squares of the mask layout also represent the centroid areas for the None and Selected File test.
Adjusting the SLM pattern sequences
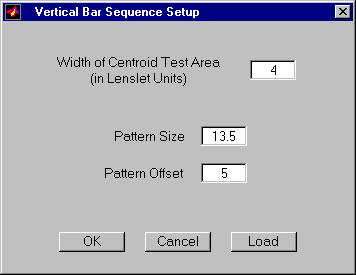
Every time the optical system has been altered, the SLM pattern sequences have to be verified and possibly adjusted. This is mainly a trial and error procedure which entails, adjusting lenslet size and offset of the SLM pattern, creating and loading the SLM sequence patterns, and testing the sequence. When running the sequence, the goal is to see only one single centroid spot per pattern square, if unaligned there are usually two or more. There is also a potential problem with the light source, if it is too strong neighboring lenslets will shine through. Since the size and offset parameters should be equal for all SLM raster images, it is practical to start with the vertical bar sequence, the horizontal bar sequence and then use their values for the single sequence. The program will show the most recently used parameters automatically.
 |
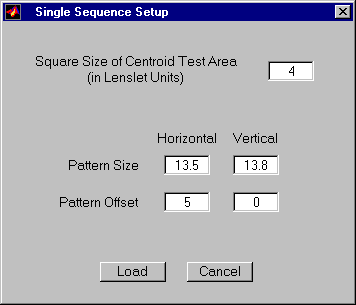 |
For each sequence a setup dialog can be opened in the Setup menu. After adjusting the size or the offset press the Load button. This will create and load the SLM pattern files and close the dialog. Now select the corresponding sequence test and verify the SLM patterns. The sequence setup dialogs have another parameter that defines the centroid area applied for each sequence. Changing the centroid area for the vertical or horizontal bar sequence does not require a re-creation of the SLM patterns. In this case, one can press the OK button to only register the modified centroid area with the program. The value for the centroid area is restricted between 2 and 8.
Camera image display
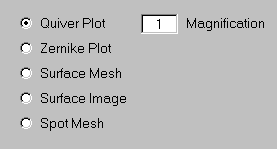
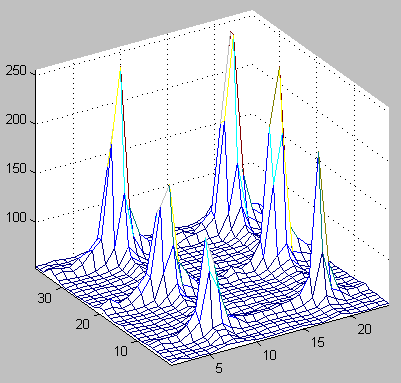
During a test the newly acquired and evaluated camera frame is displayed. If a test involving a SLM sequence is performed, the acquired frame for each different SLM pattern is displayed. The adjacent colorbar shows the maximum intensity value (1 to 256) of the present camera frame. If the Live button is active, camera frames are continuously displayed. This is helpful when setting up and adjusting the test system. With the Zoom radio button turned on it is also possible to zoom in on the camera image. Live and Zoom can't be used at the same time so either one will be turned off. To view a mesh plot of the camera image currently displayed select the Spot Mesh radio button on the graphics display below. The overlaid mask can be toggled on and off selecting ShowMask in the Options menu. If the mask is turned off the testing will take less time.
Graphical display options of the test result
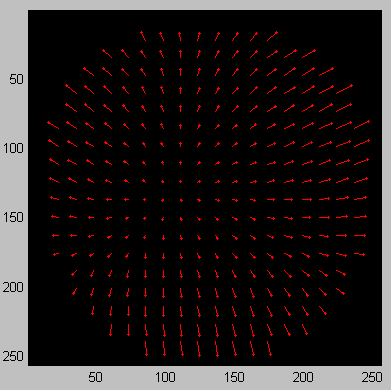
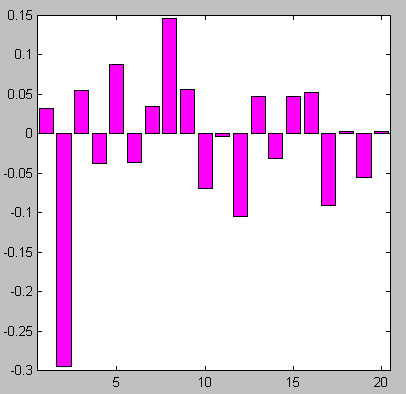
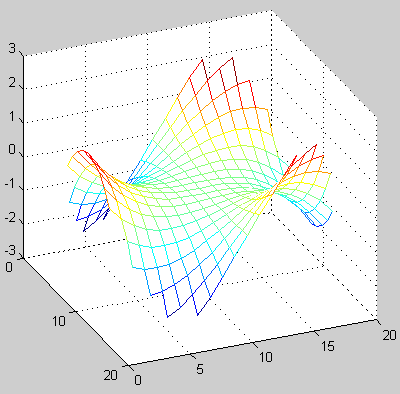
The graphics display has five options that can be selected through radio buttons. These options visualize the test results using the following methods:
 |
|
When looking at the graphical display keep following points in mind:
 |
 |
Quiver Plot |
Zernike Plot |
 |
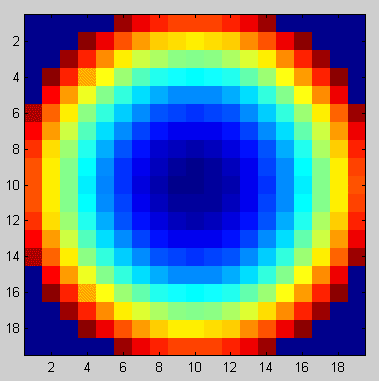 |
| Surface Plot | Surface Image |
 |
|
| Spot Mesh |
Live button
The Live button is a toggle button, in the active state camera frames are continuously displayed, in the inactive state only the present test frame will be shown. Displaying live camera images is especially helpful when setting up and adjusting the test system. The active live state does not interfere with the actual testing and can be left turned on. Live and Zoom can't be selected simultaneously so turning on Live will turn off Zoom. The frame acquisition rate during live display is up to 5fps with the mask overlay turned on, 20fps without overlay. The Live state alone will not update the colorbars or graphic display.
Zoom option
With the Zoom radio button selected, one can zoom in on the camera image, the quiver plot, the Zernike plot, or the surface image. De-selecting Zoom will restore the full size image/plot. Press the left mouse button to zoom in, the right button to zoom out, and double click the left to restore to full size. In addition, holding down the left mouse button, one can select an area to zoom in on. Since Zoom and Live don't work together turning on Zoom will turn off Live. To look at a certain area of the spot mesh, zoom in on the corresponding area of the camera image first and then press the Spot Mesh radio button. This will update the spot mesh and the camera image colorbar.
Display of Zernike coefficients
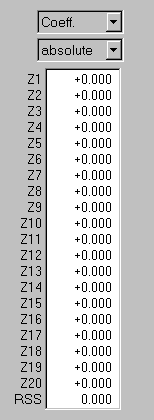 |
For each test the
first 20 Zernike coefficients are displayed in the format
that is currently selected. Possible formats are the
computed coefficients, peak to valley, and RMS. All types
are displayed in micron units and can be selected using
the popup list. To view the names and mathematical
notations (e.g. 4S2 = 4 power of rho, S sin, 2 power of
theta) for each Zernike coefficient, choose Names
in the first popup list. Once a reference has been set,
one can switch between the absolute and relative values
using the second popup list. If a test with a sample rate
greater than one is performed, the mean for each Zernike
coefficient is listed. In this case, an option to view
the standard deviation is added to the second popup list.
At the end of the list the root sum squared (RSS) of the Zernike coefficients is shown, corresponding to the selected format. |
Display of RMS values
 |
During each test, the RMS x-slope, y-slope, and phase are calculated and updated, except when the mask layout dialog is open. In this case, the RMS phase value will not be calculated and displays NaN, to avoid the re-computation of the phase matrix. |
Setting the reference
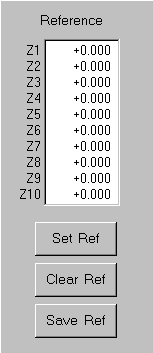 |
Clicking on the Set Ref button will store the present Zernike coefficients as the reference. The first ten values of the current reference are always listed in the same type the Zernike coefficients are listed. Press the Clear button to reset the reference to zero. |
Saving the data
Pressing the Save button will save the Zernike coefficients of the last test performed in the same format they are currently displayed. To save the reference values hit the Save Ref button. Both buttons allow the user to decide which test to save and which test to discard. To automatically save the values for the reference and each test, one can set Auto Save Data in the Options menu to on. Selecting the Save Both Abs./Rel. Data in the Options menu will save both the absolute and relative values each time, selecting Save All Three Zernike Types will save the Zernike coefficients as computed, peak to valley, and RMS each time. If no data filename was specified the data is stored in the default file data.txt in the data subdirectory. A filename and path can be designated in the File menu under Save Data As. The first time a filename is specified, all data stored in the default file is copied into the new file. Following data will be saved into this new file until another filename is entered. The data is saved in a spreadsheet format using comma delimiters and includes information about the type of test being performed.
SLM pattern design
A new SLM pattern can be created with the Pattern Design dialog in the Setup menu. Here one can define the layout of a 20x20 lenslet array, with the highlighted sections showing the lenslets receiving the light source. Clicking on a square with the left mouse button will toggle its state, holding down the left button and dragging the pointer will mark the selected area. The toggle action will always depend on the state of the first square selected.
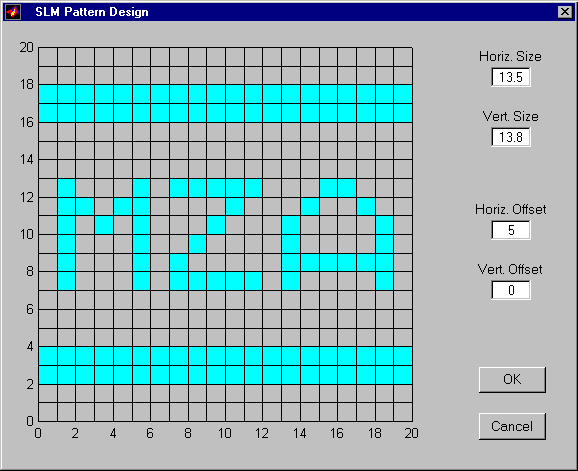
Several parameters are provided to adjust the SLM pattern (256x256 pixels), constituted from the 20x20 lenslet array, to the optical system. The pixel size of the sub-arrays, representing a lenslet, can be defined and the whole array frame can be shifted from the top/left specifying the horizontal/vertical offset in pixels. These parameters are the same for all SLM raster images created for one optical system and should be equal to the ones used in the setup of the SLM sequence pattern files. To quit the dialog without saving the design hit Cancel, to finish the design press the OK button. This will create the SLM raster image file and save it as /slm/pattern(k).s10, looping k from 1 through 20. The test type in the SLM Pattern popup list will automatically change to Selected File and the name of the pattern file is displayed in the Selected File box.
SLM pattern file selection
The SLM raster image file (*.s10) used in the Selected File pattern test can be specified in the File menu under Select SLM File. The name of the selected file is shown in the Selected File box.
Calibration factor
The calibration factor is equal to the slope value in microns for one pixel shift of the lenslet focus and must be calculated from the specifications of the individual setup of the optical system. All measured centroid slope values will be multiplied with this factor before the Zernike coefficients are computed. Use the Calibration Factor dialog in the Setup menu to view or change the current value.
Copyright and license information
ADRWFS GUI, Version 1.0
Copyright © 1999, MZA Associates Corporation, All rights reserved. Authorized recipients of this documentation may copy it freely in unmodified form for pre-authorized use only. Any distribution of this documentation must include this license page.
The ADRWFS software package and its related documentation, are copyrighted and are specifically not committed to the public domain. MZA Associates reserves all rights related to the software and documentation, except those rights ceded to the United States governments set forth in United States Air Force Research Laboratory contract F29601-98-C-0114. Any individuals or organizations wishing to obtain or learn more about the ADRWFS should contact MZA. If you or your organization have obtained the ADRWFS software from anyone but MZA, contact MZA to negotiate the conditions of its use.
MZA Associates Corporation, MZA, the MZA logo, tempus, ABLSim, WaveTrain, Adaptive Dynamic Range Wavefront Sensor, and ADRWFS are trademarks of MZA Associates Corporation. Matlab and Simulink are registered trademarks of The Mathworks, Inc.